
How to Choose the Right Lens for Video Production
Learn how to choose the right lens for video, covering focal length, sensor size, aperture, and practical tips for better video production.
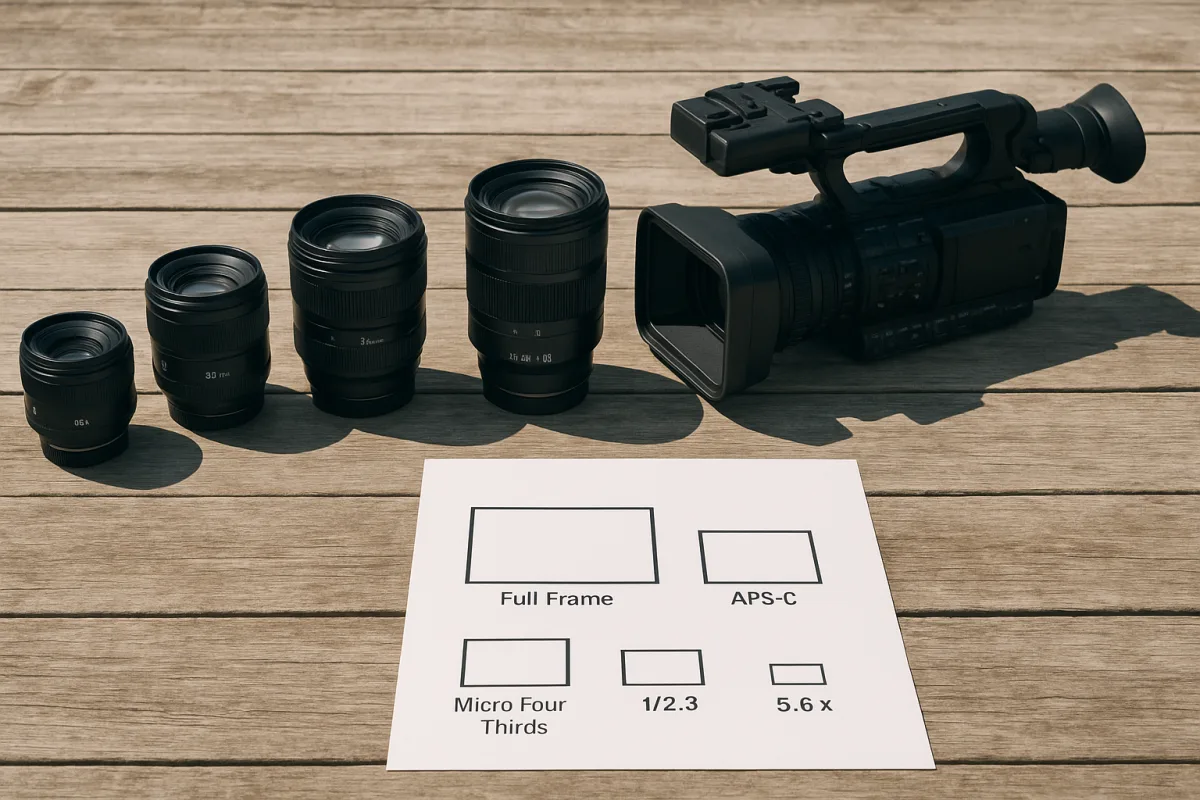
First, work out what must fit in the frame
The first problem comes before mount, budget, or maximum aperture: what does the scene need to show? Lens choice is easier when it begins with blocking, location size, and the required edit coverage rather than a vague desire for a “cinematic” focal length.
For an establishing shot, a confined interior, or a shot that must carry both actor and environment, work in the 14-35mm range. That range is commonly used for wide shots, but getting physically close to a face with the widest options can exaggerate features and make a normal conversation look unintentionally aggressive. [2][9]
For the coverage that usually carries a scene, 35-70mm is the practical middle. A 50mm is often selected for relatively natural perspective, while longer medium focal lengths can make backgrounds appear closer to the subject. That gives you a usable progression from wide master to singles. [2][9]
For close-ups, 85-135mm is the usual starting territory. These focal lengths let you frame facial detail from farther back, and they generally make it easier to separate the subject from the background. The trade-off is that small camera moves become more visible. [2][9]
Do not buy a lens because it fills a gap in somebody else’s prime set. Put your camera where it can actually go, frame the actor in the real location, then decide whether you need a wider field of view, more reach, or a different perspective.
Then translate those focal lengths to your sensor
A 35mm lens is always a 35mm lens physically, but it does not provide the same field of view on every camera. Sensor size changes the effective framing, with full-frame’s 43.3mm diagonal commonly used as the comparison baseline. [9]
This catches people after the purchase, especially when they move between full-frame, APS-C, Super 35, and smaller-sensor cameras. A lens chosen for a wide full-frame master may become a much tighter medium shot after crop is accounted for. [2][9]
Smaller sensors also produce greater depth of field at the same aperture and framing. If you are expecting full-frame-style background blur from a small sensor, you may need a faster lens, more subject-background distance, or a longer focal length. [2][9]
This is also where generic lens charts stop being enough. Make a one-page reference for your own camera listing the focal lengths that give you wide, medium, and close framing. It will save time on set and make matching a rental lens to your existing kit less speculative.
Choose aperture after you know how focus will be pulled
Fast apertures, generally f/1.2-f/2.8, help two real production problems: dim locations and the need to isolate a subject. They reduce the light needed for exposure and create shallower depth of field, which can be useful rather than merely decorative. [1][2]
They also make focus less forgiving. If an actor leans forward, or the operator’s mark shifts, the take can become unusable even though the image looked attractive in rehearsal. A faster lens is not a substitute for a focus plan.
Wide-open settings can also reveal optical compromises, including imperfections that become less apparent when the lens is stopped down. If the scene has practical lights near frame edges, detailed production design, or a demanding wide shot, shoot a quick comparison before committing. [3]
Cinema lenses express transmission as T-stops rather than f-stops. T-stops measure actual transmitted light, which is useful when matching exposure between lenses during a scene or across a set of primes. [1][2]
For a first working kit, lenses around f/1.8-f/2.8 are often the cost-performance middle ground. They provide meaningful low-light capability without forcing every shot into an extremely narrow focus plane. [1]
Decide whether the job needs primes or a zoom
Primes make the focal-length decision explicit. They are useful when you can block deliberately, want consistent rendering across a set, and have time to change lenses. They also prevent the common habit of zooming to avoid making a better camera-position decision.
A zoom earns its place when the location is crowded, the action is unpredictable, or a lens change risks missing the moment. For video, check whether it has a constant aperture. Variable-aperture zooms can shift exposure while zooming, creating an unwanted visible change in a shot. [11]
That is a workflow issue, not a luxury issue. If you intend to zoom during a take, a constant-aperture zoom is the safer specification. If you only zoom to reframe between takes, a variable-aperture model may still be workable, provided the exposure change is understood.
Do not assume a zoom is automatically more practical on a gimbal. Its size and balance can change as it extends, and lens weight affects stabiliser performance. Build the full camera, lens, battery, monitor, and filter setup before deciding a gimbal can carry it reliably. [11]
Check focus behaviour before sharpness charts
Focus breathing is the framing change visible when a lens is racked from one focus distance to another. It can be distracting in a locked-off dialogue shot, because the image appears to zoom even though the camera never moved. Cinema-oriented lenses are designed to minimise it. [9][10]
If a scene contains deliberate focus pulls, breathing belongs near the top of the selection criteria. A sharp stills lens may be perfectly usable for static shots and still be the wrong tool for a rack-focus shot that must cut cleanly with other angles.
Autofocus introduces a different check. Where autofocus will be recorded during a take, smoothness and motor noise matter. A lens that hunts visibly or transmits noise into on-camera audio can damage an otherwise usable shot. [12]
The research here does not provide brand-by-brand autofocus comparisons or breathing measurements for individual models. Do not infer that a lens is video-ready merely from its mount or maximum aperture. Look for a tested assessment of the specific lens and camera combination.
Make the mount decision before committing to a set
Mount compatibility is the next hard constraint. Canon’s current mirrorless system uses RF mount lenses, while EF and EF-S lenses can be adapted; Canon EF-M is the company’s APS-C mirrorless mount. [17]
Nikon Z mount has substantial third-party availability. FitMyLens counts 161 lenses from 12 brands, with 70 percent coming from third parties, while Nikon F-mount DSLR lenses can be adapted in appropriate systems. [18][19]
Sony E mount has similarly broad choice, with FE identifying full-frame lenses. FitMyLens lists 194 lenses from 14 brands for Sony E, 59 percent of them from third parties. [18]
Fujifilm X mount is APS-C, and FitMyLens counts 103 lenses from 11 brands, again with 59 percent supplied by third parties. Leica L mount is shared with Panasonic and Sigma, which can matter if the camera system may change later. [18]
If portability between bodies is a requirement, the Sirui Vision Prime 1 series offers interchangeable Sony E, Canon RF, Nikon Z, and L-mount options. That suits an owner-operator or small production moving among those mirrorless systems, rather than a shoot locked to one body. [3]
Leitz Cine Hektor primes have also gained Fujifilm G mount compatibility, a relevant option for productions using that larger-format platform. This is not a reason to choose a format by itself, but it is a reminder to verify the exact lens mount, not just the brand name. [3]
Set a budget that matches the job, not the catalogue
At the independent end, the Sirui Night Walker 35mm T1.2 is listed at $279 and suits a filmmaker needing a fast, single normal-to-wide cine prime on a limited budget. The Rokinon 85mm T1.5 is listed at $293 and suits low-cost close-up and portrait-oriented coverage. [4]
The Meike 25mm T2.2 is listed at $329 and suits a modestly priced wider prime for smaller spaces or establishing coverage. The Sirui VP-1 series is listed at $649 and suits filmmakers who need a higher-priced but still sub-$1,000 cine-lens option. [4]
These are stated lens prices, not complete production costs. They do not include a camera body, mount adapters where required, filters, support gear, insurance, or rental backup. The cited listings and roundups are also not a substitute for handling every lens personally, which this guide has not done.
At the professional end, the DZOfilm Arcana 32mm T2.1 is listed from $1,099 and suits a production stepping into dedicated cinema optics without approaching premium large-set pricing. The ARRI Master Prime 50mm T1.3 is listed at $15,000 and suits high-end productions needing a premium 50mm cinema prime. [3][8]
The price difference does not mean the expensive lens rescues poor blocking or uncontrolled lighting. Pay first for the characteristic that affects your planned shots: focal length, transmission, breathing control, mount, or reliable mechanics. A lens bought for its prestige can be less useful than one that fits the schedule.
Prepare for the weather and the real shooting day
For exterior work, coatings and sealing are practical specifications. Anti-reflective coatings can improve transmission and reduce flare, while hydrophobic and oleophobic surface treatments help repel water and oils from the front element. [13]
Weather sealing helps protect a lens from dust and moisture, but it does not make the lens waterproof. Treating sealed equipment as safe in sustained rain is how a sensible specification becomes an expensive repair. [14][16]
Durable construction matters because lens control rings, mounts, and housings are handled repeatedly under time pressure. It is especially relevant for rental, documentary, gimbal, and location work, where equipment is moved more often than it is displayed on a shelf. [14][15]
Finally, do not confuse lens selection with post-production decisions. The available research does not establish a direct relationship between codecs, proxies, timeline settings, or colour grading and which lens you should buy. Choose the lens for framing, light, focus behaviour, mount, and working conditions first.
Frequently Asked Questions
How do I choose the right lens for video production?
Begin by determining what the scene needs to show rather than focusing on specific focal lengths. Consider the blocking, location size, and required coverage to decide whether you need a wide, medium, or close-up shot. Then select a lens that fits the framing and perspective you want, keeping sensor size and other factors in mind.
What focal length lenses are best for different video shots?
Use roughly 14-35mm lenses for wide shots that include environment and actors, 35-70mm for medium shots with natural perspective (often 50mm), and 85-135mm for close-ups that separate the subject from the background. These ranges help achieve appropriate framing and background compression for each shot type.
How does sensor size affect lens choice for video?
Sensor size changes the effective field of view of a lens due to crop factor, so a 35mm lens on a smaller sensor will frame tighter than on full-frame. Smaller sensors also produce greater depth of field at the same aperture, meaning you may need faster lenses or longer focal lengths to achieve similar background blur as full-frame cameras.
When should I use a fast aperture lens for video?
Fast apertures (f/1.2–f/2.8) are useful in low-light situations and when you want shallow depth of field. However, stopping down can reduce optical imperfections and improve focus reliability, so a fast prime is not always the best choice. Balance aperture speed with image quality and focus control needs.
What factors should I consider when selecting lenses for video?
Consider controlled focus breathing, constant aperture on zoom lenses, manageable weight for gimbal use, and quiet autofocus if autofocus will be used. Also factor in sensor crop, desired framing, aperture needs, lens build quality, and budget. Avoid buying lenses just to fill gaps in a set without practical shooting needs.
How we researched this
This article was assembled from 19 cited references.
Nothing here is based on hands-on testing. Where a figure or finding appears, it belongs to the source cited beside it, and the writing says so rather than implying otherwise. Every source is listed below so you can check it.
Sources
- 10 Best Lenses for Filmmaking with Shallow Depth of Field (September 2026) Top Tested
- How to Choose a Camera Lens for Video Production – AVGear.com
- Leica APO-Macro-Elmarit-SL 100 f/2.8 review
- 15 Best Cine Lenses Under $1000 (October 2026) Quality Reviews
- Meike Mini Prime T2.2 Cine 25mm Lens - Swappa
- NiSi NiSi 65 PRIME 16mm T2.9 - Duclos Lenses
- Rent Canon Cn-E 35MM Ef T1.5 Prime Lens | Toronto
- Rent a ARRI 50mm T1.3 Master Prime (PL) at LensProToGo.com
- Why Lens Focal Length Matters More Than You Think | Frame & Focal
- Focus Breathing: Why Videographers Demand Better Lenses | Fstoppers
- Best Lenses for Video in 2026: Sharp, Quiet, and Steady | Aperture Authority
- Choosing a lens for video and vlogging | Lens Atlas
- Lens Coatings | CameraDex
- Built for real productions: why durability matters in cinema lenses
- What does “good build quality” in a lens actually mean? | Unique Photo Community
- Understanding Lens Specifications: What the Numbers Mean – Icon Photography School
- Canon EOS R6 V Lens Compatibility Guide: RF, RF-S and Adapted EF Lenses Explained - Camera Times
- Mirrorless lens mount statistics (2026): third-party support, zoom/prime split & brands per mount | FitMyLens
- DSMC - Nikon Mount Usage and Supported Lenses – RED Support
Related Articles
Best Cameras for Video Production 2026
Compare the best cameras for video production in 2026, focusing on Sony FX6 and Panasonic Lumix S1R II features, codecs, and post-production workflows.
How to Use Green Screen in Video Editing: Setup and Tips
Learn how to use green screen in video editing with tips on setup, lighting, materials, and software for clean chroma key results.
Edit Video for Social Media: Tips on Formats, Length & Color
Learn how to edit video for social media with tips on formats, length, proxies, and color grading for optimal engagement and platform compatibility.
Common Mistakes in Video Editing
Learn common mistakes in video editing including timeline setup, frame rate mismatches, and timecode errors to improve your post-production workflow.