
How to Use Green Screen in Video Editing: Setup and Tips
Learn how to use green screen in video editing with tips on setup, lighting, materials, and software for clean chroma key results.
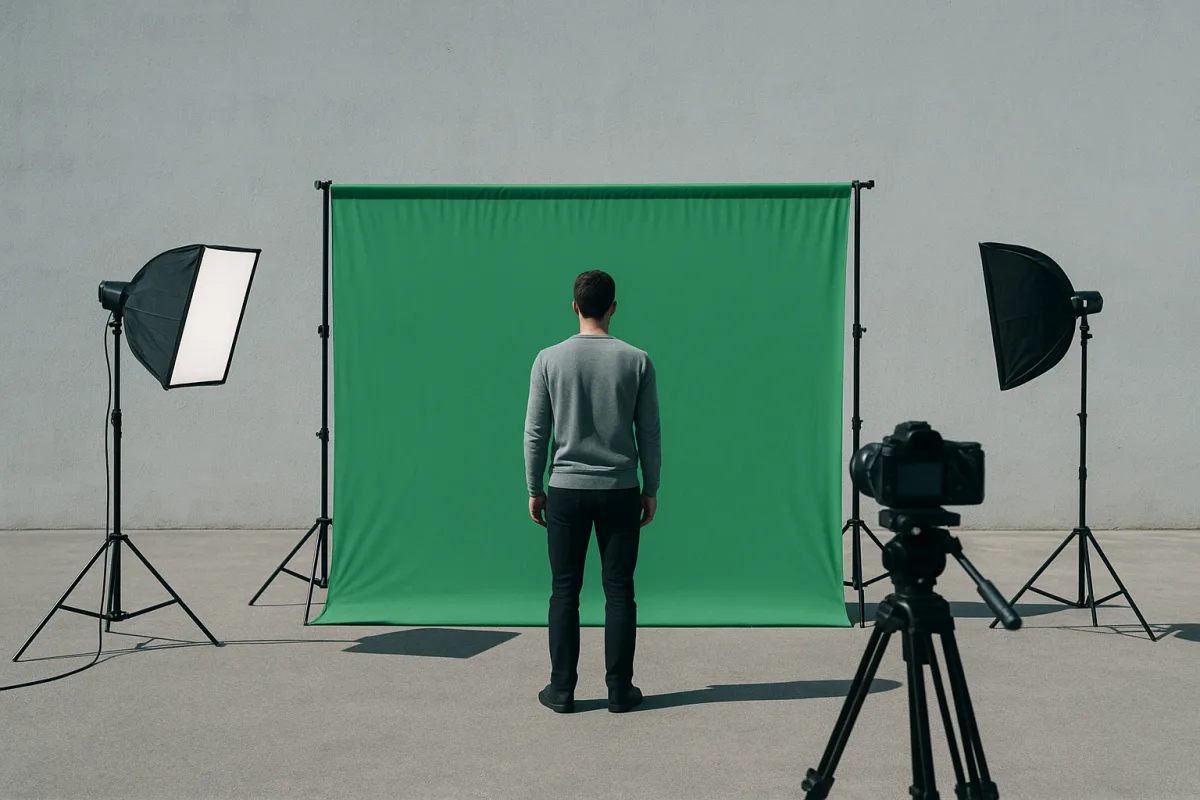
First problem: the screen is not actually a usable keying surface
A green screen only works when the editor can isolate one reasonably consistent green value. That means a flat, matte, opaque background large enough to cover the performer throughout the shot, including movement at the edges. [1][3][8]
Do not treat any green cloth as interchangeable. The useful baseline is tightly woven cotton or poly-cotton with a matte finish and roughly 200 g/m² thickness, which helps prevent light showing through from behind. [19][21]
Wrinkles are not cosmetic. Every crease creates a small change in exposure, and those dark or bright bands become holes, chatter or contaminated edges once the keyer starts separating green from skin, hair and wardrobe. [7][13]
If the screen must travel, spandex and pop-up designs can reduce wrinkle trouble. Foam-core can also provide a smoother surface, although the research brief does not establish a definitive portability or cost advantage for either material over cotton or poly-cotton. [21]
The kit market spans basic cloth to heavier-duty systems. Doom10 lists the Neewer muslin option at about $15, which suits a low-cost static setup but needs careful stretching and lighting, while the Manfrotto Chromakey Pro is about $260 and suits users prioritising a more controlled, wrinkle-resistant background. [6]
Those figures are product prices, not the complete cost of a workable setup. They do not include stands, clamps, lighting, camera support, storage media or the time spent correcting a badly hung cloth in post.
Before rolling, frame wider than the final shot and inspect the whole area the performer can occupy. A screen that looks fine behind a seated presenter may fail the moment a hand, shoulder or prop reaches into an unlit edge.
Second problem: the performer is too close, so the screen creates shadows and spill
Distance is where advice gets falsely precise. MyCreativeFX recommends 3 to 6 feet between subject and screen, while Megabant and EmojiFaces recommend at least 6 feet, with EmojiFaces extending the suggestion to 10 feet. [1][5][8]
The practical answer is to begin around 6 feet if the room allows. More separation usually makes it easier to keep the performer’s shadow off the screen and reduces green reflection on hair, skin and wardrobe. [1][5]
In a small room, 3 to 6 feet may be all you have. That can still work, but it raises the standard for screen lighting, performer lighting and framing, because the background is more likely to receive shadows and spill. [8]
Do not solve lack of space by pushing the performer directly against the cloth. A keyer can suppress some green contamination, but aggressive spill suppression can also damage fine hair detail and make skin tones look drained. [3][8]
Wardrobe belongs in this check. Avoid green clothing and green props, since the chroma key cannot know whether that green is intended background or a part of the performer that should remain visible. [1][3]
This matters especially for effects shots. If the intended composite puts an actor in a virtual cockpit, on a collapsing building or in a stylised environment, leave enough screen around hands and head for the performance, rather than cropping tightly and discovering later that a gesture exits the keyable area.
Third problem: one light is trying to do two incompatible jobs
Light the screen first, then light the subject separately. Using the same fixtures for both is a common reason home setups look uneven, shadowed and difficult to key, because a flattering face light is not necessarily an even background light. [7][13]
A reliable starting arrangement uses two soft lights aimed at the screen from roughly 45-degree angles. Megabant places those lights about 4 to 6 feet from the backdrop, while Octopis also specifies the 45-degree placement without assigning a distance. [1][4]
The exact distance can change with fixture output and screen size, so do not copy a number blindly. What matters is an even field of green across the portion of the background the camera sees, without hot spots or dark corners. [4][5]
Aim for no more than about 0.3 to 0.5 stops of brightness variation across that area. This is the measurement that saves time later, because it reduces the need to build multiple key ranges or matte patches around uneven sections. [1][4][5]
Keep the background lights matched in colour temperature and quality. The cited guidance favours daylight-balanced 5500 to 5600K fixtures with a CRI of at least 90, helping the screen render consistently rather than drifting toward yellow or magenta. [1][4][5]
Then light the performer with a separate key, fill and backlight arrangement. The backlight is particularly useful when it creates separation from the green background, but it should not be allowed to introduce another green-tinted edge. [1][8]
Look at the image before keying, not just at the screen with your eyes. Use the camera monitor or a recorded test clip to check for the performer’s shadow, uneven green exposure, shiny hotspots and reflected green along the jawline or shoulders.
There is no sourced recommendation here for outdoor green-screen colour-temperature settings. Natural light changes too quickly to pretend that a fixed studio Kelvin number will solve it, so this guide does not prescribe an outdoor setup it cannot support.
Fourth problem: the footage is too compressed or soft for clean edges
Keying needs detail around hair, motion blur and semi-transparent edges. Record a minimum of 1080p, but choose 4K when the production can support the storage and processing load, because additional image detail gives the keyer more useful information. [8]
Keep focus sharp on the performer. A soft face or blurred hairline does not become clean because the background is green, it becomes a softer, more ambiguous transition that the keyer must guess through. [1][8]
For standard dialogue or presenter material, 24 or 30 fps is the cited baseline. For fast movement, 48 or 60 fps can better preserve motion detail, provided the added data rate is practical for the shoot and edit. [8]
MyCreativeFX identifies ProRes as preferable because it avoids many compression artifacts that complicate a matte. H.264 is still usable, but it is less ideal, particularly when low bitrate compression turns the screen into blocky, shifting patches. [8]
Bitrate must scale with image size and frame rate. The brief cites about 8 Mbps for 1080p at 24 to 30 fps, 35 to 45 Mbps for 4K at 30 fps, and figures reaching 68 Mbps for 4K at 60 fps. [8][20]
Those numbers are not a promise that a particular bitrate will key perfectly. They are a useful warning against starving the image of data, while acknowledging that higher bitrates create larger files and slower transfers. [8][20]
There is no reliable evidence in the supplied research for a special green-screen proxy workflow, timeline layout or proxy codec. Proxies may be useful for general edit performance, but do not confuse smoother playback with improved key quality, which comes from the original media.
Fifth problem: the first key looks like a cut-out, or removes part of the actor
Start by sampling the cleanest representative green from the screen, then inspect the matte rather than judging only the composite. The goal is an opaque performer, a transparent background and restrained edge treatment, not the strongest possible key setting. [3][8]
Adobe Premiere Pro’s Ultra Key provides chroma-key controls including spill suppression and edge refinement. It suits editors already on Adobe’s subscription model, but the brief does not support a single universal Ultra Key preset, so build settings from the shot. [3][10]
In DaVinci Resolve, Fusion provides the chroma-keying route. Resolve suits editors who need a free version or prefer the $300 lifetime Studio licence, though a compositing-heavy Fusion workflow is not identical to Premiere’s effect-on-a-clip approach. [10][11]
Final Cut Pro’s built-in Keyer is the relevant macOS-only option. At a $300 one-time purchase, it suits an editor committed to Apple hardware who wants an integrated NLE keying tool rather than an Adobe subscription. [10][11]
For difficult material, NewBlue Chroma Key Pro costs $99 and is positioned as an advanced keying option with GPU acceleration. It suits editors who need more specialised controls than their standard effect provides, based on published tool comparisons rather than hands-on testing here. [10][12]
Red Giant Primatte Keyer is another advanced option named in the research, also associated with stronger keying controls and GPU acceleration. The supplied brief does not provide its current price, so do not budget from an assumed figure or treat it as a like-for-like $99 alternative. [10][12]
Whatever tool you use, deal with spill only after the core matte is sound. If a shoulder is green because the performer stood too close to the screen, a plugin can reduce the tint, but reshooting with greater separation is usually the cleaner fix. [5][8][13]
Edge refinement should be conservative. Overdoing it clips flyaway hair, softens fingers and produces the familiar cardboard-cut-out look, which becomes obvious once the actor is placed against a bright, high-contrast visual-effects background. [3][8]
Sixth problem: the replacement background exposes every shortcut
Composite against the actual intended background early, not only against black. A matte that looks acceptable on a dark preview can reveal green fringes, transparent clothing edges or poorly matched brightness when placed over a sky, fire effect or brightly lit virtual set. [3][8]
Match the performer’s apparent lighting to the replacement plate as far as the available footage allows. The sources strongly support separating subject and screen lighting, because that gives the editor a cleaner starting point for the composite. [1][4][8]
If the final background has strong side light, a neutral front-lit performer may still look pasted in even with a technically clean key. That is not a reason to chase a different keyer, it is a production-planning problem that should be addressed before the shoot.
Save a short test composite before recording the whole job. It is faster to discover that the screen is wrinkled, the actor’s sleeve contains green, or the backlight is spilling onto the background before every take has the same defect. [7][13]
Frequently Asked Questions
How do I properly light a green screen for video editing?
Light the green screen and the performer separately, using two soft lights positioned at roughly 45-degree angles to the screen. Aim for even illumination on the screen with brightness variation within 0.3 to 0.5 stops across the usable area to ensure a clean key. Use consistent daylight-balanced color temperature (around 5500–5600K) and lights with a high CRI (≥90) to maintain color accuracy.
What distance should the performer keep from a green screen?
The recommended distance varies between 3 to 10 feet depending on space and setup, with 6 feet being a common starting point. Greater distance helps reduce shadows and green spill on the performer, but the exact range depends on factors like shadows, spill, and lens framing.
Which green screen materials work best for video production?
Tightly woven cotton or poly-cotton fabrics with a matte finish and about 200 g/m² thickness are preferred, as they prevent light from showing through and provide a consistent keying surface. Wrinkle-resistant materials like spandex or foam-core can offer smoother surfaces and reduce wrinkles, though they may differ in cost and portability.
What camera settings are ideal for shooting green screen footage?
Record at a minimum of 1080p resolution, preferably 4K, using sharp focus and a high-bitrate, lightly compressed codec such as ProRes when available. Bitrate should scale with resolution and frame rate, for example, around 8 Mbps for 1080p at 24–30 fps and 35–45 Mbps for 4K at 30 fps, to minimize compression artifacts and improve keying quality.
How can I avoid green spill and shadows on a green screen?
Maintain sufficient distance between the performer and the green screen (ideally 3 to 10 feet) to minimize shadows and green spill. Light the screen and subject separately to avoid shadows caused by shared lighting, and fix wrinkles or uneven lighting on set before editing, as these capture issues are the main cause of poor keys.
How we researched this
This article was assembled from 21 cited references.
Nothing here is based on hands-on testing. Where a figure or finding appears, it belongs to the source cited beside it, and the writing says so rather than implying otherwise. Every source is listed below so you can check it.
Sources
- Green Screen Set Up: A Complete Green Screen Setup Guide Covering Backgrounds, Lighting, Camera Settings, and Chroma Key Editing - Megabant
- How Green Screen Works (September 2026) Complete Guide
- How to use a green screen | How does a green screen work | Adobe
- Green Screen Lighting: How to Light a Green Screen Properly for Even Color, Clean Keying, and Professional Video Results – Octopis
- Lighting a Green Screen: How to Light a Green Screen Evenly, Minimize Shadows, and Create Clean Chroma Key Results - EmojiFaces Blog 😎
- 10 Best Green Screen Kits with Lighting (September 2026) Reviewed
- Green Screen for Chroma Key: Why Home Setups Look Bad and How to Fix It
- Green Screen VFX: Complete Guide to Chroma Key Effects (2026) | MyCreativeFX
- YouTube Upload Specs — PostProduction.com
- 10 Best Software for Green Screen Editing in 2026 - Wbcom Designs
- I'm a video editor and this is the best video editing software of 2026 for creative professionals and creators
- Best Green Screen Plugins for After Effects — Green Screen Stock
- 5 Common Green Screen Mistakes (and How to Fix Them) | Genetic Code Pictures North Hollywood — GENETIC CODE PICTURES
- Green Screen Video Production 2025: Complete Chroma Key Guide | M&M Communications
- Lighting for Green Screen Chroma Key | BOLD University | BOLD Cine
- Best Green Screens for YouTube & Streaming in 2026 (Every Budget)
- Best Green Screen For YouTube 2026: Top 8 Ranked By A YouTube Expert - Alan Spicer - YouTube Certified Expert
- 8 Best Green Screen Kits (September 2026) Complete Review
- Greenscreen-Stoff: Meterware richtig kaufen – hintergrund.net
- Recommended codecs, bitrates, and file types | MediaZilla Help Center
- What Green Screen Fabric Should You Buy? Material, Wrinkle Resistance & Performance Explained
Related Articles

Unlocking Hidden Insta360 App Features: A Comprehensive Tutorial
Discover hidden features in the Insta360 app version 2, including framing guides, proxy mode, navigation shortcuts, MultiView, photo-to-video conversion, color correction, and customizable export settings. Master the art of reframing shots with this detailed tutorial.
Common Mistakes in Video Editing
Learn common mistakes in video editing including timeline setup, frame rate mismatches, and timecode errors to improve your post-production workflow.
Travel Vlog Video Editing: Workflow, Proxies & Colour Tips
Learn travel vlog video editing with tips on workflow, proxies, colour grading, and pacing to create engaging travel videos efficiently.
Handling Client Feedback in Video Editing: Best Practices
Learn how to handle client feedback in video editing with clear processes, tools, and strategies to avoid endless revisions and streamline approvals.